

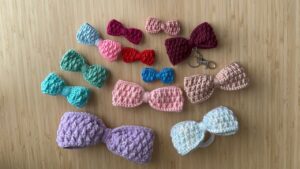


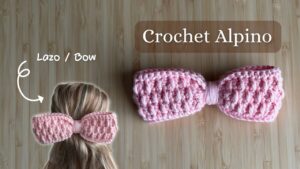
This alpine stitch crochet bow started as a simple test… or better said, as many small experiments that slowly began to tell a story.
What began as a small project to explore texture and relief gradually turned into a creative space where I could test different yarns, sizes, and combinations, and understand how the same stitch can completely change depending on the material and the final use.
The initial idea was simple: I wanted to create a small crochet project that would allow me to teach the alpine stitch in an easy and approachable way. Something quick to make, timeless, and flexible enough to experiment without pressure.
That’s how the idea of turning this stitch into a bow came up, and with it, the question that changed everything: how does the alpine stitch behave in small crochet pieces? I already knew this stitch for its texture and relief, but I had mostly seen it used in larger projects. Bringing it into a smaller format marked the real beginning of this experiment.
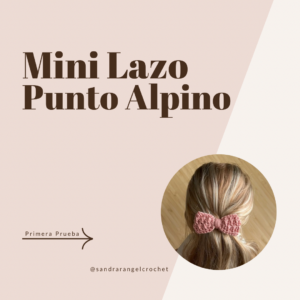
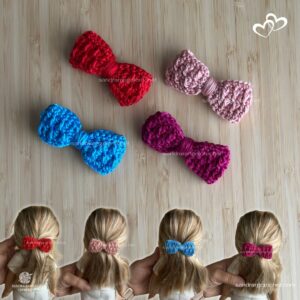
The first bow was created simply to understand the alpine stitch in crochet. For this test, I used thin embroidery thread and a 2.0 mm crochet hook, without thinking yet about accessories, combinations, or final uses.
wanted to answer very specific questions: how many rows I could work with a yarn that comes in a small amount, how small the bow would be, and whether the stitch would stay well-defined without losing its charm. I worked 30 base stitches and 6 rows, and the result was a delicate, well-defined mini bow, perfect for a young child’s hair or as a subtle decorative detail.

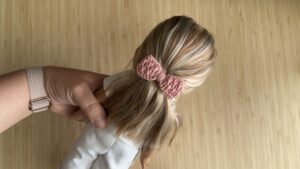
After finishing that first bow, I decided to keep testing the same design using different embroidery thread colors. I wanted to see how the alpine stitch reacted to each shade and how the relief changed visually depending on the color.
Even though the size remained small, the results varied a lot: the stitch appeared less bulky, but with very sharp definition. These tests sparked new ideas, and the bows slowly stopped being just an experiment and became potential decorative details, clips, or small handmade gift accents.
One of them even ended up attached to a paper clip, something I hadn’t planned at all, but that worked better than I expected.
If you want to learn more about the embroidery threads I used to make these bows, you can check them out here: Amazon Link.
I might also create a full post about these threads, with more details, photos, and some other projects I’ve made with them.
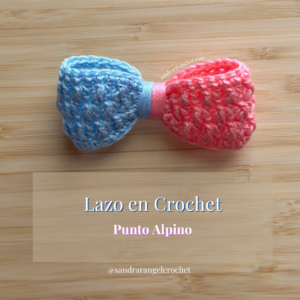
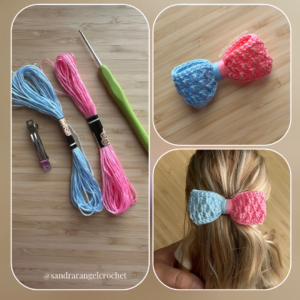
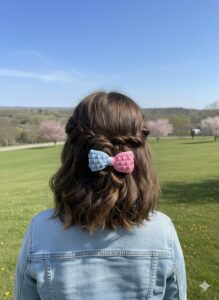
I wanted to keep working with embroidery thread, but this time my goal was to create a slightly larger bow and experiment with two colors in the same piece. I chose one skein in pink and another in blue, aiming for a soft, delicate combination that could easily work with different outfits.
For this bow, I worked 40 stitches and 8 rows, achieving a medium-sized bow that felt more noticeable while still preserving the delicacy of the alpine stitch. I liked the result so much that I decided to attach it to a hair clip, imagining it being worn comfortably by a child.
I documented this bow with step-by-step photos, and I’m considering turning them into an ebook or even a separate, more detailed blog post, which could be linked from here in the future.
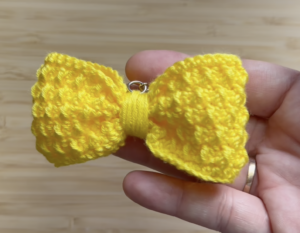
After that, I started experimenting with other thin yarns, adjusting the number of stitches and rows to create larger bows. This stage was key to understanding how the same design can transform simply by changing the material.
For these tests, I used:
Alize Diva in yellow
Truboo Yarn in green and camel shades
A variegated yarn from my leftover yarn stash
I explain the specific details of each test—such as stitch counts, rows, and combinations—in the YouTube video. Later on, I may also complement this post with screenshots or photos from that explanation to make the information even clearer.
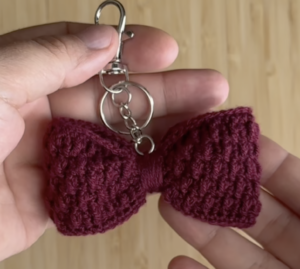
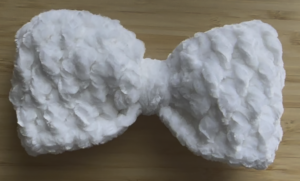
Then I decided to experiment with chenille yarn and crochet larger bows. This type of yarn is incredibly soft and pleasant to the touch, but the alpine stitch doesn’t show the same level of definition as it does with thinner materials.
Even so, the result has its own charm. Personally, I find these bows work better as keychains rather than hair accessories. They are soft pieces, perfect to carry in a bag, touch during moments of nervousness, or simply enjoy as a sensory object.
As I always say, everyone can choose how to use them, depending on their own taste and needs.
Among all these bows, there was one I decided to crochet specifically for the YouTube video. I made it in a pink shade using Truboo Yarn by Lion Brand, a bamboo yarn I love for its subtle shine, softness, and how smoothly it glides on the hook while crocheting.
In that video, I show you step by step how I made the bow, and I also share all the other bows I created throughout this experimental process with the alpine stitch and different materials.
You can watch the YouTube video here: Crochet Bow with Alpine Stitch
If you want to see the alpine stitch chart, it’s available in my YouTube shorts, along with other quick explanations that complement this project.
This post was a little creative lab where I explored different sizes, colors, materials, and uses for crochet bows. Each test taught me something new, and that’s exactly what I love most about crochet: discovering while creating.
Leave me a comment letting me know which other projects or techniques you’d like me to share in future posts—I’d love to hear from you! 🧶
Este lazo en crochet con punto alpino nació como una prueba… o mejor dicho, como muchas pruebas pequeñas que, sin darme cuenta, terminaron contando una historia.
Lo que empezó como un proyecto sencillo para experimentar con textura y relieve, poco a poco se convirtió en un espacio para probar hilos, tamaños y combinaciones, y para entender cómo un mismo punto puede cambiar por completo según el material y el uso final.
La idea inicial era clara: quería crear un proyecto pequeño en crochet que me permitiera enseñar el punto alpino de una forma sencilla y accesible. Algo rápido de hacer, que no pasara de moda y que funcionara como base para experimentar sin presión.
Así fue como se me ocurrió trabajar este punto en forma de lazo, y de ahí nació la pregunta que lo cambió todo: ¿cómo se comporta el punto alpino en piezas pequeñas? Yo ya conocía este punto por su textura y relieve, pero casi siempre lo había visto aplicado en proyectos grandes. Llevarlo a un formato pequeño fue el verdadero inicio del experimento.
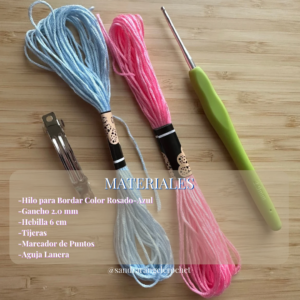
El primer lazo fue únicamente para entender el punto alpino en crochet. Para esta prueba utilicé hilo para bordar delgado y un gancho de 2.0 mm, sin pensar todavía en accesorios, combinaciones o usos finales.
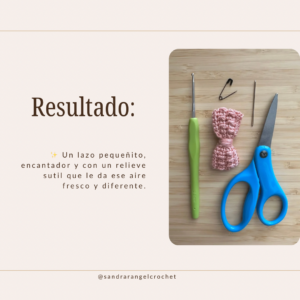
Quería responder preguntas muy concretas: cuántas filas podía tejer con un hilo que no trae muchos gramos, qué tan pequeño quedaría el lazo y si el punto se definiría bien sin perder su encanto. Tejí 30 puntos como base y 6 filas en total, y el resultado fue un mini lazo delicado y bien definido, perfecto para el cabello de una niña pequeña o como un detalle sutil en algún mechón.
Después de ese primer lazo, decidí seguir probando el mismo diseño en diferentes colores de hilo para bordar. Quería ver cómo reaccionaba el punto alpino según el tono del hilo y cómo cambiaba la percepción del relieve en cada color.
Aunque el tamaño seguía siendo pequeño, el resultado variaba mucho visualmente: el punto se veía menos voluminoso, pero con una definición muy marcada. Estas pruebas empezaron a abrir nuevas ideas en mi mente, y los lazos dejaron de ser solo un experimento para convertirse en posibles detalles decorativos, clips o pequeños acentos para regalos hechos a mano.
Uno de ellos incluso terminó colocado en un clip de papel, algo que no tenía planeado al inicio, pero que funcionó mejor de lo que imaginaba.
Si quieres conocer más sobre los hilos para bordar que utilicé para hacer estos lazos, puedes verlos aquí: Link Amazon
Pronto podría hacer un post completo sobre estos hilos, con más detalles, fotos y algunos otros proyectos que he creado con ellos.
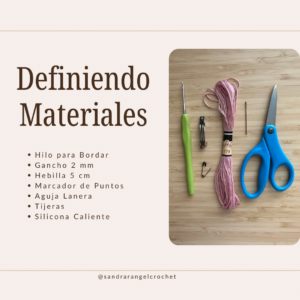
Quise seguir trabajando con hilo para bordar, pero esta vez el objetivo era hacer un lazo un poco más grande y experimentar con dos colores en una misma pieza. Elegí una madeja en rosado y otra en azul, buscando una combinación suave, delicada y fácil de combinar con distintas prendas.
Para este lazo tejí 40 puntos y 8 filas, logrando un tamaño mediano que se sentía más protagonista, sin perder la delicadeza del punto alpino. El resultado me gustó tanto que decidí colocarlo en una hebilla para el cabello, pensando especialmente en una niña que pudiera usarlo de forma cómoda.
De este lazo tengo un paso a paso en fotos, y no descarto convertirlo en un ebook o incluso en un post independiente más detallado, que podría enlazar desde aquí en el futuro.
Después comencé a probar otros hilos de grosor delgado, ajustando la cantidad de puntos y filas para lograr lazos de mayor tamaño. Esta etapa fue clave para entender cómo el mismo diseño puede transformarse simplemente cambiando el material.
En estas pruebas utilicé:
Alize Diva en color amarillo
Truboo Yarn en tonos verde y camel
![]()
Un hilo matizado que tenía entre mis restos de lanas
Los datos específicos de cada prueba —como la cantidad de puntos, filas y combinaciones— los explico en el video de YouTube. Más adelante incluso podría complementar este post con capturas o fotos de esa explicación, para dejar la información aún más clara.
Luego quise experimentar con hilo chenille y tejer lazos de mayor tamaño. Este tipo de hilo es muy suave y agradable al tacto, pero el punto alpino no se define de la misma manera que en otros materiales más delgados.
Aun así, el resultado tiene su propio encanto. Personalmente, estos lazos me funcionan mejor como llaveros que como accesorios para el cabello. Son piezas suaves, ideales para llevar en un bolso, tocar en momentos de nerviosismo o simplemente disfrutar como un objeto sensorial.
Pero como siempre digo, cada persona puede darles el uso que prefiera, según su gusto y necesidad.
Entre todos estos lazos, hubo uno que decidí tejer especialmente para el video de YouTube. Lo realicé en un tono rosado utilizando Truboo Yarn de Lion Brand, un hilo de bambú que me encanta por su brillo, suavidad y por lo bien que se desliza en el gancho mientras tejemos.
En ese video te muestro paso a paso cómo hice el lazo, y además te enseño todos los demás lazos que fui creando durante este proceso de experimentación con el punto alpino y distintos materiales.
Aquí puedes ver el video de YouTube: Lazo con el Punto Alpino
Si quieres ver el gráfico del punto alpino, lo tengo disponible en mis shorts de YouTube, junto con otras explicaciones rápidas que complementan este proyecto.
Este post fue un pequeño laboratorio creativo donde exploré tamaños, colores, materiales y usos distintos para los lazos en crochet. Cada prueba me enseñó algo nuevo, y eso es justamente lo que más disfruto del crochet: descubrir mientras hago.
Déjame en los comentarios qué otros proyectos o técnicas te gustaría que comparta en próximos posts, ¡me encantaría leerte! 🧶
